Step-by-Step Process Explained: Water Leak Detection in Rockledge in Commercial Buildings
A water leak in a commercial building rarely announces itself in a clean, obvious way. In Rockledge, it’s common for the first “sign” to be a musty odor near a tenant suite, a soft spot in a ceiling tile, an unexplained spike in a water bill, or an AC system that suddenly can’t keep humidity under control. By the time water becomes visible, it has often traveled through insulation, wall cavities, slab edges, or rooftop penetrations—and it may already be feeding hidden mold growth.
That’s why professional water leak detection is less about guesswork and more about a systematic process. In busy commercial spaces—medical offices, retail plazas, warehouses, schools, churches, restaurants, and multi-tenant buildings—leak detection needs to be accurate, minimally disruptive, and documented well enough to guide repairs and insurance decisions without tearing apart half the property.
Below is the step-by-step approach that works best in Rockledge and nearby Brevard County areas like Viera, Melbourne, West Melbourne, Merritt Island, Titusville, and Satellite Beach.
What Water Leak Detection Means in a Commercial Setting
Water leak detection is the process of locating the source (or sources) of unwanted moisture intrusion, measuring how far the water has migrated, and identifying the conditions that allow it to continue. In commercial buildings, this can involve multiple systems at once—plumbing, HVAC condensate lines, roof drainage, fire suppression piping, slab plumbing, exterior envelope intrusion, or even irrigation overspray.
The goal isn’t simply to find “a wet spot.” The goal is to find the origin, confirm pathways, and map the affected materials so water damage repair, restoration, and mold prevention can be done correctly the first time.
Why This Happens So Often in Rockledge
Rockledge properties deal with a familiar mix of Florida challenges: heavy seasonal rains, sudden downpours, high humidity, and frequent HVAC use nearly year-round. Add commercial building realities—flat roofs, rooftop units, long plumbing runs, multiple restrooms and break rooms, and tenant build-outs—and you get plenty of opportunities for leaks to start small and spread.
Common local contributors include:
- Wind-driven rain finding weak points around roof penetrations and flashing
- Clogged roof drains or scuppers backing water up under membranes
- Aging sealant around windows, doors, and storefront systems
- AC condensate line clogs and overflowing drain pans
- Slab or under-slab plumbing leaks that migrate silently
- Humidity that prevents materials from drying naturally once wet
In places like Rockledge and Viera, buildings can look fine from the outside while moisture quietly accumulates inside walls or above drop ceilings.
Common Signs Building Owners and Managers Notice
Commercial leak problems often show up as “operational” issues first, not dramatic damage. Watch for:
- Unexplained increases in water bills
- Recurring musty odors in the same suite or hallway
- Ceiling tile staining, sagging, or warping
- Peeling paint, bubbling drywall, or stained baseboards
- Flooring that cups, lifts, or feels spongy
- Occupants reporting humidity or “damp air” complaints
- Rusting metal studs, door frames, or fasteners near exterior walls
- HVAC supply vents sweating or diffusers dripping
The earlier these are investigated, the smaller the affected area usually is—and the easier it is to prevent mold remediation later.
Hidden or Overlooked Sources in Commercial Buildings
In Rockledge commercial buildings, leaks frequently come from places that don’t look “plumbing-related” at first. Some of the most overlooked sources are:
- Rooftop unit (RTU) condensate drains and pans
- Roof penetrations for electrical, refrigeration, or telecom lines
- Fire sprinkler piping in concealed ceiling spaces
- Bathroom group supply lines behind chase walls
- Ice maker lines, breakroom sinks, or mop sinks
- Exterior wall transitions at parapets, stucco joints, or storefront frames
- Poorly sealed expansion joints
- Irrigation heads spraying walls daily
A thorough detection process assumes the source might be counterintuitive and proves it through measurements and targeted testing.
Why DIY Leak Hunting Usually Fails
In a commercial building, “DIY leak detection” often turns into patchwork: replacing a ceiling tile, repainting a stain, adding caulk, or calling a roofer without moisture mapping. The result is often a leak that seems fixed—until the next storm or the next busy workweek.
DIY approaches fail because:
- Water travels, so the visible damage is rarely the source
- Moisture can remain trapped in insulation and wall cavities
- Multiple leaks can exist at the same time (roof + plumbing + condensate)
- “Dry to the touch” doesn’t mean dry inside
- Quick patch repairs don’t address drainage, slope, or pressure issues
- Disturbing wet materials can spread spores if mold has started
For commercial buildings where downtime costs money, accuracy matters more than speed.
Professional Leak Detection and Testing Explained
Professional detection starts with evidence and narrows down causes systematically. In Rockledge, the best results come from combining building history, visual investigation, non-invasive moisture tools, and controlled testing.
Depending on the case, professionals may use:
- Moisture meters (pin and non-pin) to measure material saturation
- Infrared imaging to identify temperature patterns consistent with moisture
- Hygrometers to track humidity and dew point conditions
- Borescopes for limited cavity viewing without major demolition
- Pressure and flow testing for plumbing systems
- Dye testing for roof drains or condensate systems
- Smoke testing for suspected pipe/vent issues in certain setups
The key is to match the method to the suspected source—without causing unnecessary disruption to tenants.
Step-by-Step Water Leak Detection Process in Rockledge
Here’s the practical step-by-step workflow that fits most commercial buildings:
Step 1: Intake and timeline review
The process starts by gathering details: when the issue appears, weather conditions, recent roof work, tenant changes, and which areas are affected. Patterns matter—leaks that worsen during rain point one way, while leaks that worsen during business hours point another.
Step 2: Visual inspection of the affected zone
Technicians inspect ceilings, walls, baseboards, flooring transitions, and any nearby plumbing fixtures or mechanical equipment. In drop-ceiling buildings, selected tiles may be lifted to check for staining, rust, or wet insulation.
Step 3: Moisture mapping
Using moisture meters, the team maps readings across the area—not just at the visible damage. This creates a “wet footprint” that shows how far water has migrated. Moisture mapping prevents the common mistake of repairing the wrong location.
Step 4: Thermal scan for moisture patterns
Infrared imaging helps locate cooler areas often associated with evaporation from wet materials. It’s not a stand-alone answer, but it’s a strong guide for where to test next—especially above ceilings and along exterior walls.
Step 5: Source isolation (roof vs plumbing vs HVAC vs envelope)
Next, the team narrows down the system likely responsible. For example:
- A leak that appears only after rain often points to roof or exterior envelope intrusion.
- A leak that appears daily or after restroom use often points to plumbing supply/drain lines.
- A leak near an RTU or mechanical closet often points to condensate issues.
Step 6: Targeted testing
This is where proof happens. Depending on the suspected source:
- Roof: controlled water testing near penetrations or suspect seams (done carefully to avoid creating new damage)
- Plumbing: pressure tests, fixture isolation, or tracer methods
- HVAC: condensate line inspection, drain pan evaluation, duct sweating assessment
- Exterior envelope: inspection of sealants, joints, flashing, and transitions, sometimes paired with localized spray testing
Step 7: Limited access checks when needed
If readings suggest moisture inside a wall cavity or above a specific ceiling area, limited access may be made to confirm conditions. The goal is precision—small openings in the right spots, not broad demolition.
Step 8: Documentation and a repair roadmap
A professional result includes clear findings: source location(s), moisture map boundaries, affected materials, and recommended repair sequence. This helps property managers coordinate roofers, plumbers, and restoration teams efficiently.
Proper Water Removal and Drying After Detection
Finding the leak is only half the job. The other half is stabilizing the building so mold and material deterioration don’t continue.
Commercial water removal and drying may include:
- Extracting water from carpets or flooring systems
- Removing saturated ceiling tiles or wet insulation where necessary
- Setting up dehumidifiers and air movers sized for the space
- Monitoring moisture levels daily until materials reach safe targets
- Isolating affected areas to reduce disruption to tenants
If water has been present long enough, mold inspection and testing may be recommended before rebuilding or re-occupying enclosed spaces.
Water Damage Repair and Restoration in Commercial Buildings
After drying, repairs should follow a “clean rebuild” approach:
- Replace damaged drywall, ceiling grid components, or insulation
- Address any compromised framing or rusted fasteners
- Repair roof membranes, flashing, or drainage pathways properly
- Correct plumbing failures with access panels where appropriate
- Restore flooring systems based on manufacturer and material requirements
Skipping steps—especially rebuilding before full drying—often leads to recurring odors, repeated staining, and eventual mold remediation.
Air Ducts, AC Systems, and Moisture Problems
In Rockledge commercial properties, HVAC is a frequent contributor to moisture issues, even when it’s not the original leak source. When humidity stays high or ducts sweat, condensation can mimic a roof leak and keep materials damp.
Key HVAC-related leak and moisture issues include:
- Clogged condensate lines causing pan overflow
- Poorly insulated ducts sweating above ceilings
- Improper thermostat settings (overcooling without dehumidification)
- Low airflow causing coil icing and melt-off cycles
- Duct leaks pulling humid attic air into the system
When needed, air duct cleaning and targeted HVAC moisture corrections can help prevent ongoing dampness that fuels mold growth.
How to Prevent Leak Problems in Rockledge Commercial Properties
Prevention is mostly about routine inspection and moisture control—especially before and during the rainy season.
Practical prevention steps include:
- Schedule roof inspections after major storms and at least annually
- Keep roof drains and scuppers clear and verify proper flow
- Inspect and maintain sealants around penetrations and storefront systems
- Service HVAC systems, flush condensate lines, and confirm pan drainage
- Use periodic moisture checks in known risk areas (restrooms, mechanical rooms, perimeter suites)
- Address humidity complaints early instead of “tuning them out”
- Keep maintenance logs—patterns help pinpoint recurring problems
A small maintenance routine often prevents the expensive cycle of repeated repairs and tenant disruption.
Why Local Experience Matters
Brevard County buildings behave differently than buildings in drier climates. In Rockledge, Viera, Melbourne, Merritt Island, and Cocoa Beach, humidity alone can keep materials damp long enough for microbial growth if drying isn’t done correctly.
Local experience matters because it helps teams recognize common intrusion points, understand how wind-driven rain behaves on Florida buildings, and differentiate true leaks from condensation problems. Palm Bay Mold Removal has seen how quickly a “minor” leak in a commercial hallway can become a multi-suite issue when moisture migrates above a shared ceiling grid.
Calm, Trust-Based Call to Action
If you manage a commercial property in Rockledge and you’re seeing stains, odors, or humidity problems that keep returning, a step-by-step water leak detection process can prevent bigger damage and reduce downtime. The sooner the source is confirmed and the moisture footprint is mapped, the easier it is to plan repairs, complete drying, and avoid mold-related complications later.
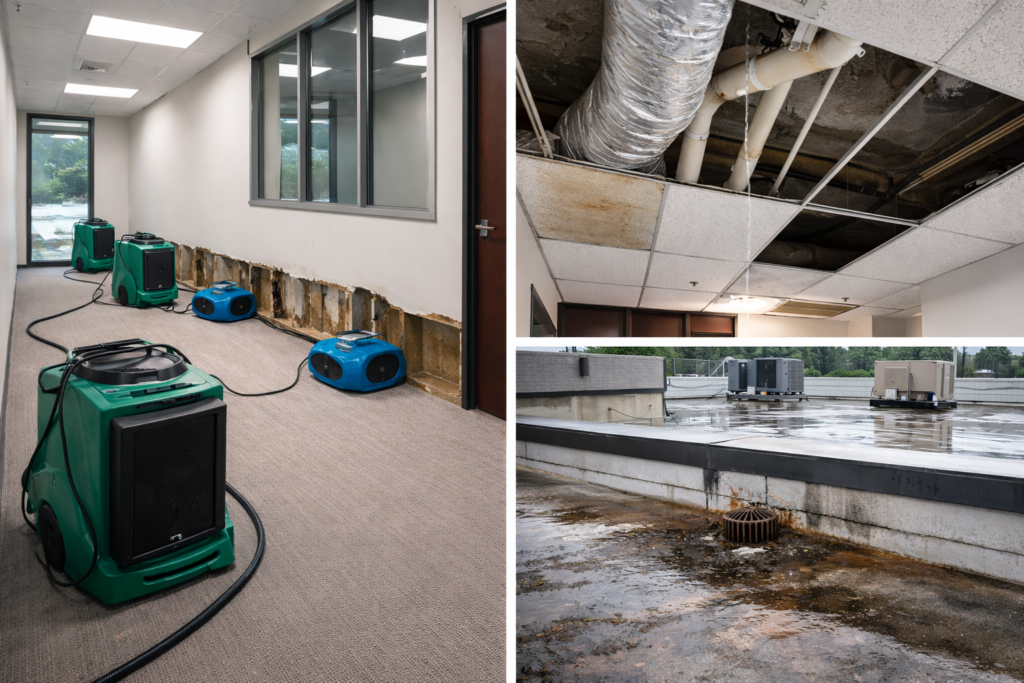
attic access area above a commercial drop ceiling showing water staining on insulation and metal framing from a roof leak, realistic photo, natural lighting, no people, no text, no logos
close-up of moisture meter being held near damp drywall in a commercial hallway wall (only the tool visible, no hands), realistic photo, natural lighting, no people, no text, no logos
commercial mechanical room with dehumidifier and air movers positioned for drying after leak detection, clean realistic photo, natural lighting, no people, no text, no logos